The constructive triangles are used to demonstrate that all plane
geometric figures can be constructed from triangles. There are five
boxes: 2 rectangular, 1 triangular, and 1 large and 1 small hexagonal.
Each box contains triangles of different sizes, shapes, and colors.
With the exception of Rectangular Box 2, black guidelines are painted
in different positions on the triangles to help the child to construct
other figures. This should be encouraged as an exploratory work that
will provide a foundation for later concepts of equivalency,
similarity, and congruency.
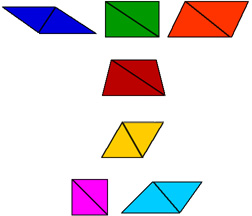
Rectangular Box 1
three pairs of large right angled scalene triangles in three
different colors
a pair of red triangles that form an isosceles trapezoid bisected
diagonally
a pair of equilateral yellow triangles
two different colored pairs of large right angled isosceles
triangles
Rectangular Box 2
Two equilateral triangles
Two right angled isosceles triangles
Two right angles scalene triangles
A trapezoid divided diagonally to form an obtuse angled scalene
triangle and an acute angled scalene triangle
All of the figures are blue and there are no longer any
guidelines.
Triangular Box
Large Hexagonal Box
One large yellow hexagon, the same size as the box, cut by
joining the vertices of every other angle to form one large equilateral
triangle and three obtuse angled isosceles triangles. There are black
guidelines along the perimeter of the equilateral triangle and the
bases of the smaller triangles.
A second large equilateral triangle divided along its
intersecting angle bisectors to form three obtuse angled isosceles
triangles. There are black guidelines along the two equal sides of each
triangle.
Two equal red obtuse angled isosceles triangles the same size as
the yellow ones, but with their guidelines along the base opposite the
obtuse angle.
Two equal gray obtuse angled isosceles triangles the same size as
the others with black lines along one of the equal sides.
Small Hexagonal Box
6 gray equilateral triangles with guidelines along two sides to
form a hexagon, the same size as the box
3 green equilateral triangles (same size as above) which are put
together to form an equilateral trapezoid. One triangle has black
guidelines along two sides, the other two have a single guideline.
A large yellow triangle which inscribes within the box, formed by
joining every other vertex of the hexagon
2 additional red equilateral triangles (same size) each with a
single black guideline
6 red obtuse angled isosceles triangles with guidelines along the
base opposite the obtuse angle
PRESENTATION
Rectangular Box 1
The teacher opens the box and says to the child, "We call these
the constructive triangles. Why? Because we can construct other figures
with them."
She asks the child to remove them from the box and group them by
similar shapes. "Now can we group each set by color also?"
When the child has done so, beginning with the equilateral
triangles, the teacher traces the black guide lines with her fingers
and moves them together until they touch. "Now what do we call this?"
If the child does not know the name, the teacher should give it.
She might take the isosceles triangles next, and ask the child to
do the same. There are two sets of isosceles triangles, one forms a
square and the other forms a parallelogram.
"Let's try putting the scalene triangles together." The result is
a rectangle, and a parallelogram."
"Now our last two red ones. Can you put those together on the
guideline. What is the figure you have made? A trapezoid."
Review with the child the figures that have been made with the
different kinds of triangles. With the younger children the attention
is on the black line and it is a sensorial experience of shape, and
vocabulary review of terms that have already been learned in the
geometric cabinet.
The children can trace these new shapes and label them to put in
their own geometry book.
Rectangular Box 2
Here the child can see how many shapes can be made using one
shape. With this material we have no guidelines to tell us what we must
do. The child takes the equilateral triangles and discovers that there
is only one shape to be made, no matter how he or she joins them. The
child takes the other triangles in turn and discovers how many
different shapes can be made with each pair. Here the teacher can check
the child's work orally to be sure that the child knows the names of
the figures and that the child can write and spell them correctly,
since this is a sensitive period for reading and handwriting.
Use the same procedure with each of the successive constructive
triangle boxes, allowing plenty of time for experimentation, practice
and mastery before the child is invited to go on to the next box.

 Rectangular Box 1