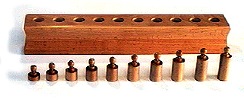
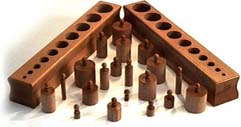
Four lightly varnished wooden blocks each containing ten
cylinders. The
cylinders vary in size in a regular way. Each cylinder has a
wooden
knob to hold it by.
Block 1
The cylinders vary in height, length, and width (taking width and
length through the diameter) by 1/2 cm. on each dimension between
any two cylinders in succession. The largest cylinder is the
tallest and thickest.
Block 2
The cylinders vary in height, length and width as in block 1, but
here the tallest cylinder is the thinnest and the shortest is the
thickest.
Block 3
The cylinders are all the same height. They vary by 1/2 cm. in
length and 1/2 cm. in width (measured through the diameter)
between any two in succession.
Block 4
The cylinders vary only in height. They cylinders differ in
height by 1/2 cm. between any two in succession.
Blocks 1 and 2 are the easiest, as there are three differences in
dimension.
Block 3 comes next with two differences in dimension.
Block 4 differs only in height and is by far the most difficult
of
the four blocks. Also, the circumferences of the holes are all
the
same and, therefore, do not offer a guide.
Block 4 should not be brought into the classroom until some
children are really proficient with the first 3 blocks.
PURPOSE:
1) The child learns to judge size by sight.
2) The child reaches an abstract conception of dimension, and
this interest and knowledge enable him to observe the
environment with intelligence.
3) The child develops coordination of movement.
4) The child is given an indirect preparation for writing. The
fingers and thumb, which will later hold the pencil, are being
used to hold the knobs. These digits are also used in the
manipulation of most tools (e.g. spoon, scissors, brush).
Therefore, the hand is being trained for manipulative skill.
5) A preparation for mathematics.
AGE:
2 and 1/2 to 5 years.
PRESENTATION:
The teacher sits beside a child at a table and places the block 1
in
front of him or her. Holding the knob of the first cylinder with
the first two
fingers and thumb of her dominant hand, the teacher removes it
and
places it silently on the table in front of the block. She
removes each
cylinder in turn, holding them in this way, placing them silently
in
front of the block in mixed order. When all the cylinders have
been
removed, she pauses. She looks at the cylinders carefully,
selects the
largest (or smallest) and returns it noiselessly to its place.
She
replaces the cylinders in order in this way.
At any point of the lesson the child may join in. If he or she
begins removing
and replacing cylinders, the child can be left to work alone. The
child may
hold the cylinders incorrectly. He or she will make mistakes in
putting them
in the holes. The child will probably handle them noisily. The
child can
replace the cylinders in any order he or she likes.
The child must not be interrupted when working, but the next day
the teacher
should take a block and show him or her the right way to handle
the cylinders.
For example: The teacher shows the child her hand, points out her
first
two fingers and thumb, and demonstrates how she holds the knob
and
removes a cylinder. She then says to the chid, "Show me your
hand. You have two fingers here and a thumb. Take out this
cylinder
using those two fingers and thumb." The child will enjoy taking
out
cylinders and replacing them while the teacher watches. The child
will
begin to handle the material correctly.
If the child is being noisy, on another day, the teacher can take
a
block and sit beside him or her. The teacher speaks very softly.
"Listen. I can take
the cylinders out and put them on the table without making any
noise at
all. Are you listening?" The teacher demonstrates how to handle
the
cylinders quietly.
"Now, I will listen to you. You try it." Let the child try.
Children
love this. Their attention is drawn to noise, and they begin to
use
their hands well and to make a great effort to handle the
material
quietly. The teacher also shows that the cylinders can be
returned
noiselessly to their sockets.
If the block has been given at the right age, the child will have
difficulty in replacing cylinders. The teacher must not
interfere. The
material is self-correcting. If a mistake has been made, there
will
always be one cylinder that does not fit. Corrections will not
help. No
one can teach another to judge size. The child learns through
repeated activity.
EXERCISE 1:
The child helps him or herself to a block and continues to use it
as presented
for as long as he or she likes.
The child can use any set 1, 2, or 3 without a further lesson.
The child can use set 4 when that is brought into the classroom.
Block 4 is by far the most difficult. So, this block is not
brought
into the classroom until some children are proficient with the
first 3
blocks.
EXERCISE 2:
When the child can do each set well he or she can be shown how to
use two sets
together, mixing the cylinders from both and replacing them.
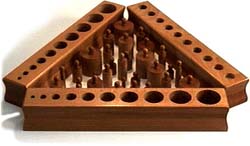
EXERCISE 3:
When the child uses two sets well, the teacher can show him or
her how to take
any three sets, place them on the table in the form of a
triangle, mix
the cylinders in the middle of the triangle and then replace them
in
their corresponding sockets.
EXERCISE 4:
Lastly, the child can be shown how to use all four sets together.
He or she is
shown to place them on the table in the form of a square and mix
all the
cylinders inside the square and then replace them.
SELF-CORRECTION
In blocks 1, 2, and 3, the cylinders cannot all be replaced if an
error
has been made. In Block 4 all can be returned, but some will be
too tall
and others too short to fit the holes. Most children can see that
this
is incorrect.
Note: Do not introduce the later stages until children are
really
proficient with the 4 blocks used singly. The aim is never to get
the
children to work quickly, but to let them work with apparatus for
as
long as they will perfect themselves and arrive at abstract
conception.
This must be understood as applying to all the apparatus.
This exercise is a sight exercise. A blindfold is never used. It
is not
possible to match the size of the cylinders to the size of the
holes by
touch as some holes are too narrow for the fingers to reach the
bottom.
The cylinders are used on a table - not on the floor.
VOCABULARY:
After the child has developed a concept of dimension and has noticed
the differences between the various cylinders, the teacher can use the "Three
Period Lesson" to introduce the terminology listed below for
each block.
Block 1 and 2: large - small
large- larger- largest
small - smaller- smallest